
This post is about a small project I made to automate the creation of a supertimeline from forensic collections. The goal was to have an easy way to go from a KAPE or Velociraptor triage (or a disk image) to a timeline viewable in Timeline Explorer, without having to run multiple tools by hand for every system. The construction loosely follows the creation process learned in SANS FOR508 course (esp. filtering noise artifacts).
The code, setup instructions and current limitations are available on GitHub: styrup-code/supertimeline_creator.
Overview#
When investigating an incident, you often want to see events from different artifacts next to each other: Windows Event Logs, Registry entries, file system timestamps and many more. A supertimeline puts these timestamps into one place, which can help reconstruct what happened and when. I personally view supertimelines as a great tool to pivot from one finding to another, but the original artifacts and their context are still needed to verify your findings.
As I found the process quiet repetitive to create a supertimeline in the SANS FOR508 way and could not find public project which implements and an full automation, including deployment, I created one with the help of AI. So the idea was to put the workflow into a Docker container, which can run on Windows or Linux and produces a separate timeline for each input. The approach is scalable to process many triage images in parallel.
Currently supported inputs are:
KAPEandVelociraptortriage ZIPsKAPEVHDX containersE01and raw disk images (dd,img,raw) -> be aware of time usage processing a full image
How does it work?#
The Python launcher starts the container with the input directory mounted read-only. The runner detects the input type and prepares the evidence for processing. For disk images it selects the largest allocated partition if there is more than one; the selected filesystem must be readable and unencrypted.
If an NTFS $MFT is available, MFTECmd converts it into a bodyfile. The runner filters that bodyfile for noise artifacts by default and imports it into Plaso using its mactime parser. Plaso also processes the other supported artifacts with log2timeline. Finally, psort exports the events to an l2tcsv file for analysis in Timeline Explorer.
For every input you get:
- A
supertimeline.csvfor analysis - A
.plasodatabase with the parsed events - A warning report, which should be checked for parsing errors and limitations
Created Toolchain#
The launcher runs the processing tools in a Docker container. This is the path from the collection to the finished timeline:
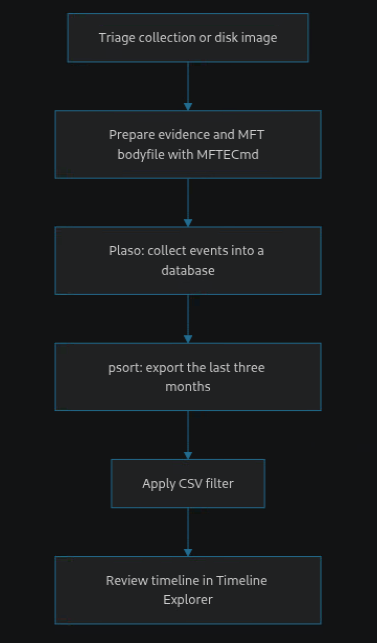
MFTECmd converts an available $MFT to a bodyfile. The runner can filter noisy entries before Plaso imports it with its mactime parser. Plaso’s log2timeline also extracts events from the remaining artifacts or selected filesystem, then psort exports the database to CSV. Finally, the runner can filter the exported Event Log rows, and the CSV is ready to review in Timeline Explorer.
Usage#
You’ll need Docker with Compose and Python installed. Clone the repository, put your collections directly in an input folder and create an output folder. Both folders must exist before starting. From the project directory you can run for example:
python3 run.py --input /path/to/input --output /path/to/output --timezone Europe/ZurichThe timezone is used for source timestamps without timezone information the CSV output is in UTC.
By default the CSV covers the last three calendar months. You can set an inclusive date range with --timewindow 2026-01-01..2026-01-31, or use --all-time to export all dates. The saved Plaso database contains parsed events outside the CSV time window too.
Export with timewindow
python3 run.py --input /path/to/input --output /path/to/output --timezone Europe/Zurich --timewindow 2026-01-01..2026-01-31Export all dates, disable the two optional filters and limit the container to four CPUs and 8 GB memory:
python3 run.py --input /path/to/input --output /path/to/output --timezone Europe/Zurich --all-time --no-filter --cpus 4 --memory 8gOn Windows, with Docker Desktop using Linux containers, the same launcher can be started from PowerShell:
python3.exe run.py --input 'C:\Cases\Input' --output 'C:\Cases\Output' --timezone Europe/ZurichUse local folders on Windows, as the launcher does not support UNC paths or mapped network drives. For an E01 or raw disk image you can also set --image-drive-letter D to label its NTFS MFT paths with D:. This is a label you choose, not a detected original drive letter.
Filters and tips#
The project filters some MFT entries before they are imported, to reduce noise. It also selects specific Windows Event Logs and Event IDs in the exported CSV. You can adjust the filter lists, or disable both filters with --no-filter. Be aware that filtered MFT entries are also missing from the saved Plaso database, while the Event Log CSV filter does not remove events from that database. Even with --no-filter, Plaso’s Event Log Creation Time selection still applies.
A few things to keep in mind:
- Different source timezones need separate runs. Also check the time window before you start looking for events.
- Disk images can contain more than one partition. Check the warning report to see which was selected; VSS snapshots are not included for disk images.
- Processing can need a lot of disk space and time, especially for larger collections. You can set container limits with
--cpusand--memory. - Always review the warning report. A completed run does not mean that every artifact was parsed successfully.